
Rise in voice search increases need for personalization and relevancy
 By Two Rivers Marketing

Two Rivers Marketing Jul 25, 2023

As the sun set over the skies on the July Fourth holiday weekend earlier this month and we all (except our poor dogs) kicked back to enjoy the fireworks, Universal Analytics (UA) began its descent.
We’ve known that this migration to the new generation of Google Analytics (GA4) has been coming for a while now, but it was officially confirmed on July 1, 2023, as Google Analytics tweeted:
“Today, we begin shutting down Universal Analytics as we welcome you to Google Analytics 4. This will not happen overnight, so some Universal Analytics properties may continue to process data. However, all properties have now been added to the queue, and those that have not completed the upgrade will Jumpstart on a rolling basis.”
With this gradual shutdown of UA properties, users must migrate to GA4 to continue leveraging the power of advanced web analytics. While the migration process may initially seem daunting, we hope this summary will help simplify it.
Upon logging in, you might discover that a GA4 property has been automatically created for you. However, it is recommended that you set up your own property to fully access advanced features. Regardless of the auto-migration status, we suggest going through these quick steps to get your Google Analytics migrated to the new system and start capturing baseline data. You can also download this checklist for easy reference as you work through each step
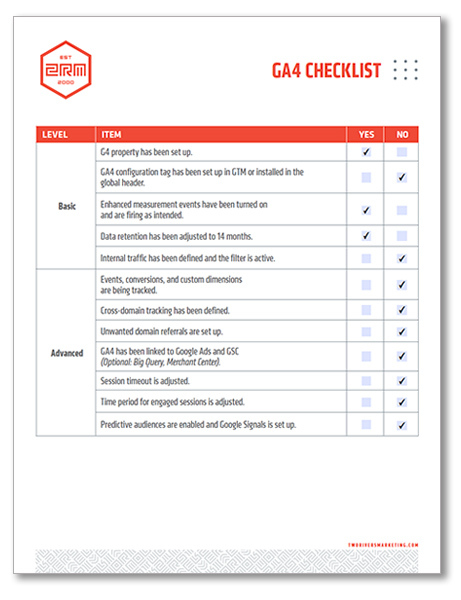
The following are critical steps for correctly setting up your GA4 property to ensure that you don't miss out on essential benefits:
Data Retention: Navigate to Admin > Data Settings > Data Retention and adjust to 14 months. Enable "Reset user data on new activity" to extend the retention period with each new user engagement.
Exclude Internal Traffic: Exclude internal traffic by defining internal IP addresses and enabling filters in data filters. To do this, navigate to Admin > Data Stream > Tag Configuration > Define Internal Traffic.
Enhanced Measurement: Review and adjust auto-tracked events by going to Admin > Data Stream > Enhanced Measurement. A blue toggle should be on for any out-of-the-box events you want tracked. Some accounts may intentionally need to turn off in favor of custom GTM event tracking. Use the DebugView to test as needed.
Install the gtag via Google Tag Manager (GTM) or the website's header as needed.
Use the DebugView to ensure that your property is firing and enhanced events are firing as intended.
To maximize the potential of GA4, we next suggest spending time working through some more advanced strategies:
Set up cross-domain tracking (if applicable).
Make sure that unwanted domain referrals are set up.
Check that GA4 has been linked to Google Ads and GSC (Optional: Big Query, Merchant Center).
Adjust session timeout if needed.
Check that time period for engaged sessions has been adjusted if needed.
Enable predictive audiences and Google Signals if needed.
Reconfigure custom goals and events within GA4 or GTM, depending on tracking needs.
Create custom audiences for marketing purposes.
While the migration to GA4 has a learning curve, embracing this new platform will empower your businesses to gain a comprehensive understanding of user behavior, optimize marketing strategies, and make data-driven decisions for long-term success.
For additional support or consultation on how to fully unlock the potential of GA4 tracking and reporting capabilities, reach out to our team of web analytics experts.

More Articles on Future-Proof Your Business
By Two Rivers Marketing
By Two Rivers Marketing
 By Patrick McGill